Content Strategy
R1.1 Camera Setting & Fully Manual Mode
Marketing
Overview
In this module, students will learn about the Exposure Triangle in photography, which includes understanding and balancing the interplay of aperture, shutter speed, and ISO to achieve desired exposure. They’ll explore manual camera settings and the use of Automatic Exposure Compensation (AEC) in semi-automatic modes. Additionally, students will familiarize themselves with distinct camera modes—Aperture Priority, Shutter Priority, and Program Mode—and their applications in different shooting scenarios for creative control.
By The End of This Lesson Students Will Be Able To
- Understand the Exposure Triangle: This includes a comprehensive understanding of aperture (f-stop), shutter speed, and ISO and how they interact to achieve balanced exposure in photography.
- Aperture: Recognize how aperture controls the amount of light entering the camera and how it affects depth of field.
- Shutter Speed: Understand how shutter speed determines the duration of light exposure and its effects on image brightness and motion capture.
- ISO: Comprehend how ISO affects the camera sensor’s sensitivity to light and the image brightness and noise.
- Balance the Exposure Triangle: Grasp how adjusting one setting requires compensation with the other two settings to maintain a balanced exposure.
- Apply Manual Camera Settings: Demonstrate the ability to manually adjust aperture, shutter speed, and ISO to attain desired exposure and creative effects.
- Understand Automatic Exposure Compensation (AEC): Learn to use AEC in semi-automatic modes, and how it can help in challenging lighting situations.
- Distinguish Between Different Camera Modes: Familiarize with Aperture Priority (A or Av), Shutter Priority (S or Tv), and Program (P) modes, and recognize when and how to use each.
- Aperture Priority Mode: Learn to control depth of field by manually setting the aperture while the camera adjusts the shutter speed.
- Shutter Priority Mode: Understand how to control motion by manually setting the shutter speed while the camera adjusts the aperture.
- Program Mode: Know when to use this mode that offers a balance of automation and control by adjusting both the aperture and shutter speed based on lighting conditions.
- Effectively Utilize Camera Modes: Develop skills to adapt to various shooting scenarios and achieve desired results using different camera modes and settings.
Course Content
Camera Settings: Fully Manual Settings and The Exposure Triangle
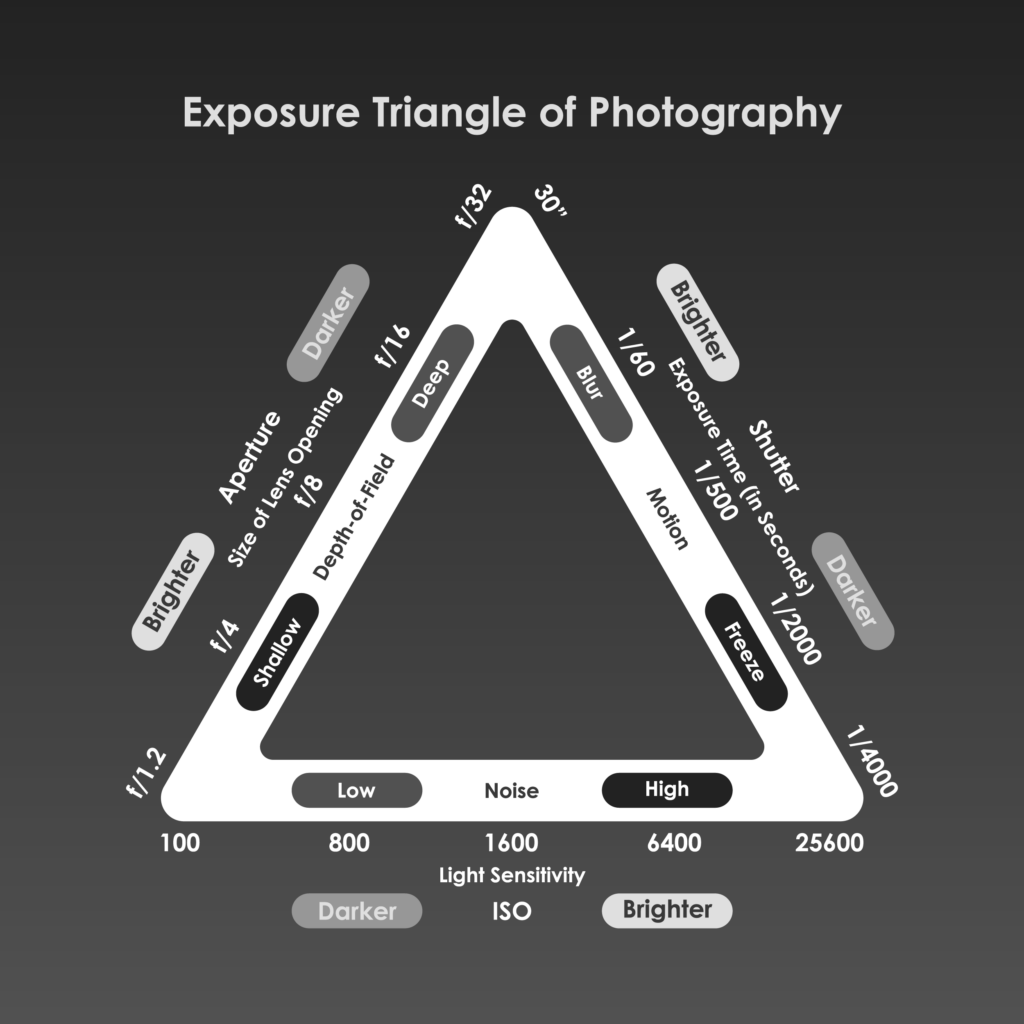
The exposure triangle is a core concept in photography that describes the relationship between aperture, shutter speed, and ISO. Each of these settings affects the exposure and has unique implications for the resulting image. To maintain a balanced exposure (an exposure value of 0), adjusting one element requires compensating with the other two. Let’s examine each setting in more detail and their interrelationships:
- Aperture (f-stop): Aperture refers to the size of the opening in the camera’s lens, which controls the amount of light entering the camera. Aperture is measured in f-stops, where a lower f-number indicates a larger opening and a higher f-number indicates a smaller opening. A larger aperture allows more light, leading to a brighter image and a shallower depth of field. A smaller aperture allows less light, resulting in a darker image and a deeper depth of field.
If you widen the aperture (decrease the f-number), you increase the amount of light entering the camera. To maintain a balanced exposure, you must compensate by either increasing the shutter speed (to let in less light) or lowering the ISO (to reduce the sensor’s sensitivity to light).
- Shutter Speed: Shutter speed determines how long the camera’s sensor is exposed to light. Faster shutter speeds (e.g., 1/1000s) allow less light to enter, resulting in darker images and freezing motion. Slower shutter speeds (e.g., 1/10s) allow more light to enter, producing brighter images and potentially introducing motion blur.
If you increase the shutter speed (making it faster), you decrease the amount of light entering the camera. To maintain a balanced exposure, you must compensate by either opening the aperture (decreasing the f-number) or increasing the ISO (boosting the sensor’s sensitivity to light).
- ISO: ISO controls the camera sensor’s sensitivity to light. A lower ISO value (e.g., 100) yields a darker image with less noise (graininess), while a higher ISO value (e.g., 3200) produces a brighter image with more noise.
If you increase the ISO, you increase the sensor’s sensitivity to light, resulting in a brighter image. To maintain a balanced exposure, you must compensate by either closing the aperture (increasing the f-number) or decreasing the shutter speed (making it slower).
In summary, aperture, shutter speed, and ISO are interconnected in the exposure triangle, and adjusting one requires compensating with the other two to maintain a balanced exposure. Understanding these relationships is essential for photographers, as it enables them to make informed decisions about camera settings to achieve the desired exposure and creative effects.
Automatic Exposure Compensation (AEC) is a feature used in semi-automatic modes such as Aperture Priority (A or Av), Shutter Priority (S or Tv), and Program (P) modes. In these modes, the camera controls one or more of the exposure settings (shutter speed, aperture, or ISO) while the photographer sets the other(s).
When using AEC, the photographer can make adjustments to the exposure by telling the camera to over- or under-expose the scene by a certain amount (measured in stops). This can be useful in challenging lighting situations or when the camera’s built-in metering system does not provide the desired exposure. In manual mode, the photographer has full control over all exposure settings and does not rely on AEC. Instead, they can adjust the exposure directly by changing the shutter speed, aperture, or ISO settings as needed.
This setting is particularly helpful when shooting in rapidly changing or high-contrast environments, as it allows the photographer to focus on composition and framing, while the camera intelligently manages the exposure adjustments. AEC simplifies the process of achieving perfect exposures and enables photographers to capture stunning images with greater ease and efficiency, regardless of the lighting situation.
Aperture Priority, Shutter Priority, and Program modes are semi-automatic modes found in most digital cameras, allowing photographers to control certain aspects of exposure while the camera adjusts the others. Here’s an overview of each mode and their differences:
- Aperture Priority Mode (A or Av): In Aperture Priority mode, the photographer manually sets the aperture value (f-stop), which determines the depth of field in the image. The camera then automatically adjusts the shutter speed to achieve a proper exposure based on the selected aperture and the lighting conditions. This mode is particularly useful when the photographer wants to control the depth of field, either to isolate a subject with a blurred background (using a wide aperture) or to have everything in focus (using a narrow aperture).
- Shutter Priority Mode (S or Tv): In Shutter Priority mode, the photographer manually sets the shutter speed, controlling how long the camera’s sensor is exposed to light. The camera then automatically adjusts the aperture value to achieve a correct exposure based on the chosen shutter speed and the lighting conditions. This mode is ideal when the photographer wants to control motion in the image, either to freeze fast-moving subjects (using a fast shutter speed) or to create motion blur (using a slow shutter speed).
- Program Mode (P): In Program mode, the camera automatically sets both the aperture and shutter speed based on the lighting conditions and the camera’s built-in metering system. However, the photographer can still shift the combination of aperture and shutter speed (while maintaining the same exposure value) by using the camera’s program shift function. This mode offers a balance of automation and control, making it suitable for those who want some creative input without manually adjusting each exposure setting.
Each of these modes provides varying degrees of control over the exposure settings, allowing photographers to choose the level of automation that suits their needs and creative intentions. By understanding and utilizing these different modes, photographers can quickly adapt to various shooting scenarios and achieve the desired results with greater ease.
Cognitive Engagement Questions
-
-
- Assignment 1: Mastering the Exposure Triangle (Assignment #EXP-TRI-001)Objective: To understand and demonstrate mastery over the Exposure Triangle.Task: Students must capture three photographs of the same scene with different settings to demonstrate their understanding of aperture, shutter speed, and ISO. One image should prioritize a low depth of field, another should capture or freeze motion, and the last should experiment with high ISO. They should submit these images along with the settings used for each, and a brief explanation of their understanding of the exposure triangle based on this exercise.
Email Subject: Assignment #EXP-TRI-001: Mastering the Exposure Triangle
Assignment 2: Exploring Automatic Exposure Compensation (AEC) and Semi-automatic Modes (Assignment #AEC-MODES-002)
Objective: To understand and demonstrate the use of AEC and semi-automatic modes (Aperture Priority, Shutter Priority, and Program Mode).
Task: Students must capture a series of images using each of the semi-automatic modes in challenging lighting situations, making use of AEC as needed. They should submit one image from each mode where AEC was applied effectively, along with the settings used, mode chosen, how AEC was used, and their observations.
Email Subject: Assignment #AEC-MODES-002: Exploring Automatic Exposure Compensation and Semi-automatic Modes
Assignment 3: Creative Photography with Manual Settings (Assignment #MANUAL-003)
Objective: To demonstrate the ability to apply manual camera settings for creative effect.
Task: Students should capture three images that creatively use depth of field, motion capture, and high ISO noise, respectively. They should manually adjust aperture, shutter speed, and ISO to achieve these effects. Submissions should include the three images, the settings used, the creative intention, and the results obtained.
Email Subject: Assignment #MANUAL-003: Creative Photography with Manual Settings
In all assignments, students should email their results to clintonali@gmail.com for evaluation or constructive criticism. Students must ensure the appropriate assignment number and topic is used in the email subject line for easy identification and sorting.
- Assignment 1: Mastering the Exposure Triangle (Assignment #EXP-TRI-001)Objective: To understand and demonstrate mastery over the Exposure Triangle.Task: Students must capture three photographs of the same scene with different settings to demonstrate their understanding of aperture, shutter speed, and ISO. One image should prioritize a low depth of field, another should capture or freeze motion, and the last should experiment with high ISO. They should submit these images along with the settings used for each, and a brief explanation of their understanding of the exposure triangle based on this exercise.
-
© 2023 Karimah Clinton Academy. All rights reserved.

The materials provided in this course, including text, graphics, images, and other content, are for informational purposes only and are the exclusive property of Karimah Clinton Academy. Unauthorized use and/or duplication of these materials without express and written permission from Karimah Clinton Academy is strictly prohibited.”